Bring Your Own AWS Account
When attending this workshop during an event organised by AWS, you can choose to use a temporary account for the duration of this workshop. If not done already, follow these instructions to access a temporary AWS account. Once you have access, proceed to next section. You can safely skip this page.
AWS Account
To follow the instructions proposed by this workshop, you need to have an AWS Account and an IAM user with the minimum priviledges required to access the services we use in this workshop. In addition, you need to know the access key and secret key for the IAM users.
If you already have an AWS account, have IAM Administrator access and have access key and secret key, you can skip this page.
If you don’t already have an AWS account and you are not using an AWS temporary account: create your account now (you need a valid phone number and a credit card)
Create an IAM User
Once you have an AWS account, create an IAM user by following these steps:
-
Open the IAM console using this link. (Alternatively, navigate to the IAM console, from the left menu, click Users and click Add User button on the top of the page.)
-
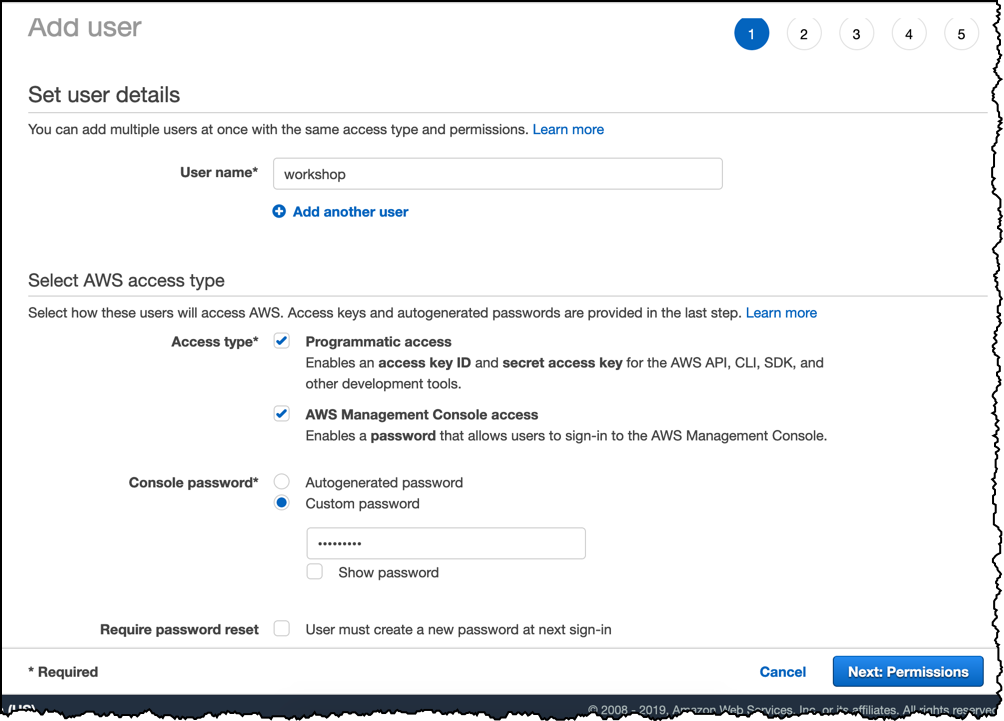
Enter the user details as shown below and click Next: Permission
-
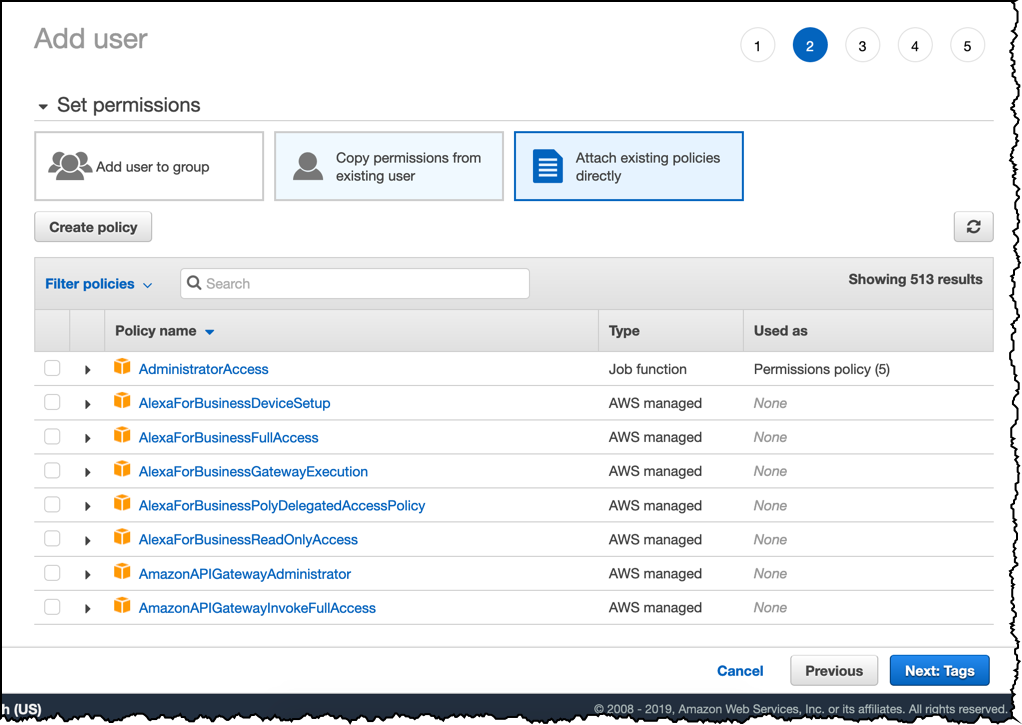
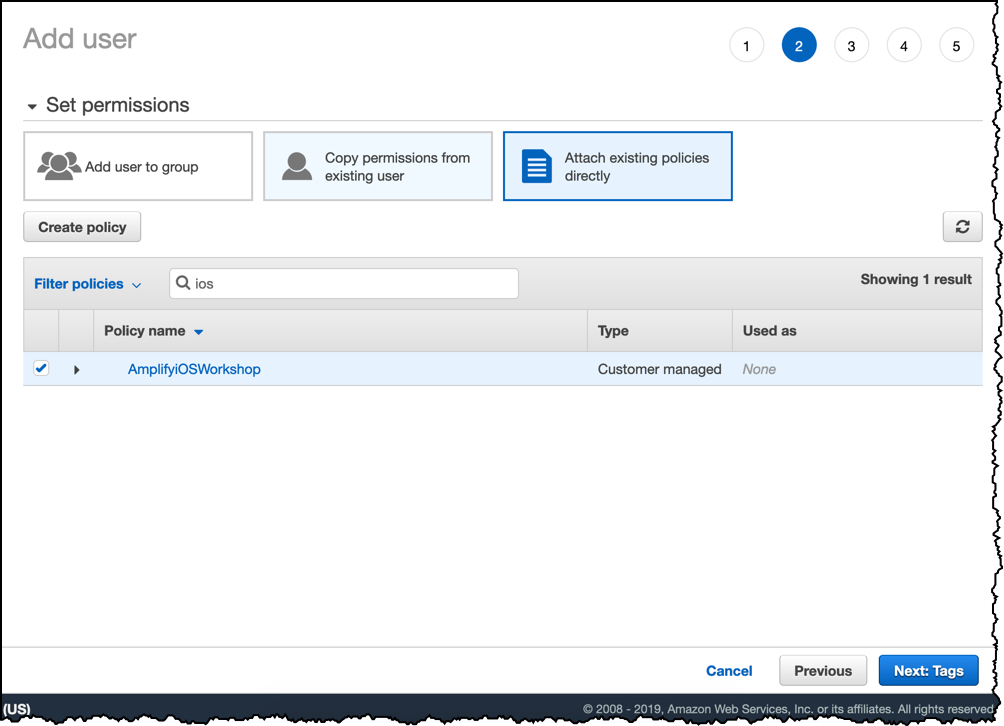
click Attach existing policies directly, then click the button Create Policy. This creates a new tab to create the policy.
-
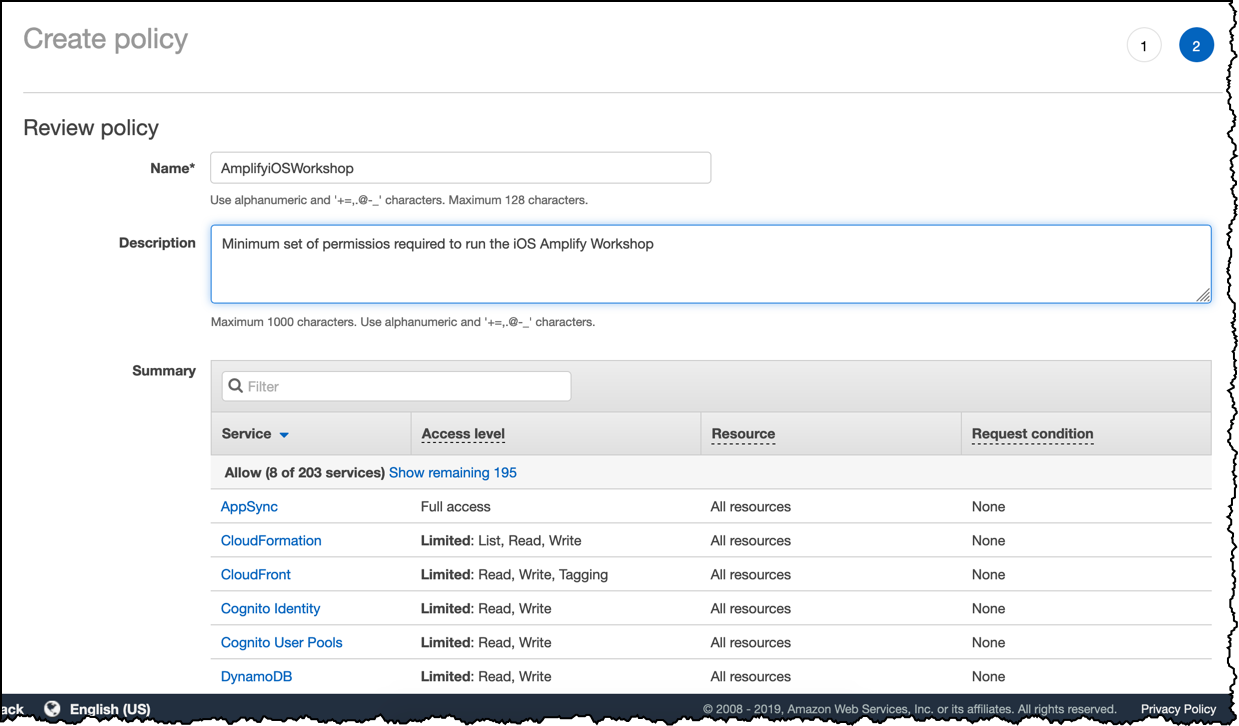
Click JSON tab and replace the policy with the one below, then click Review Policy
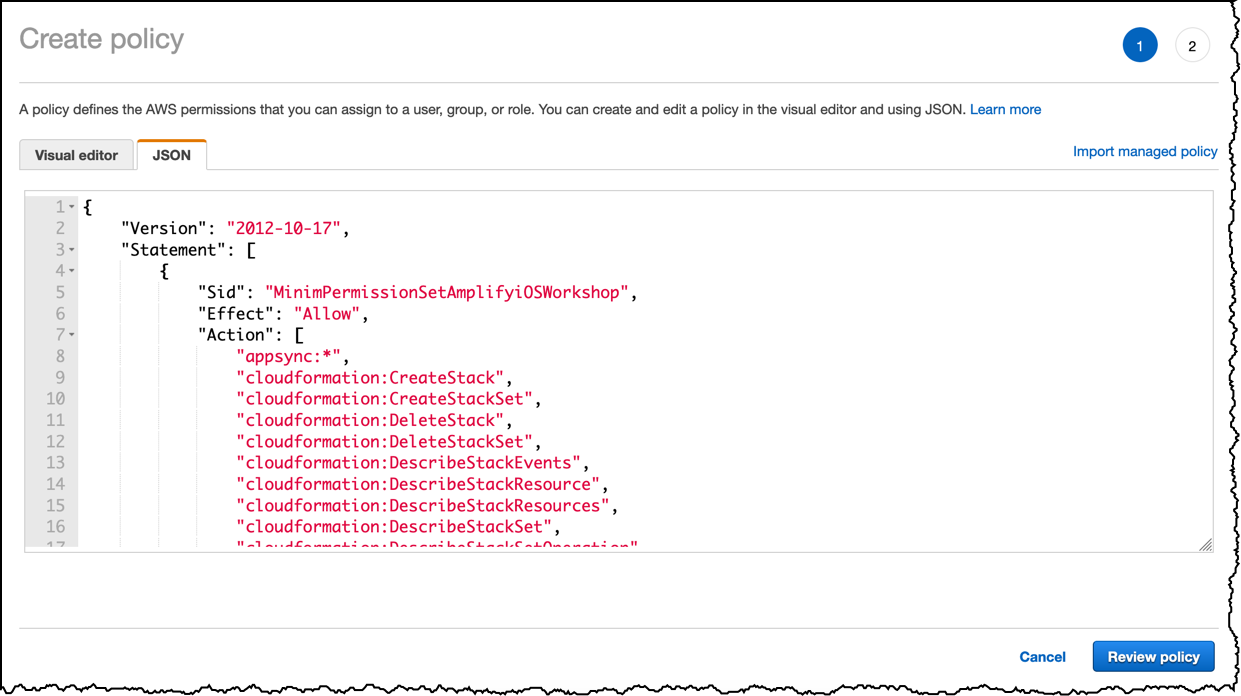
{
    "Version": "2012-10-17",
    "Statement": [
        {
            "Sid": "MinimPermissionSetAmplifyiOSWorkshop",
            "Effect": "Allow",
            "Action": [
                "appsync:*",
                "cloudformation:CreateStack",
                "cloudformation:CreateStackSet",
                "cloudformation:DeleteStack",
                "cloudformation:DeleteStackSet",
                "cloudformation:DescribeStackEvents",
                "cloudformation:DescribeStackResource",
                "cloudformation:DescribeStackResources",
                "cloudformation:DescribeStackSet",
                "cloudformation:DescribeStackSetOperation",
                "cloudformation:DescribeStacks",
                "cloudformation:ListStackResources",
                "cloudformation:UpdateStack",
                "cloudformation:UpdateStackSet",
                "cloudfront:CreateCloudFrontOriginAccessIdentity",
                "cloudfront:CreateDistribution",
                "cloudfront:DeleteCloudFrontOriginAccessIdentity",
                "cloudfront:DeleteDistribution",
                "cloudfront:GetCloudFrontOriginAccessIdentity",
                "cloudfront:GetCloudFrontOriginAccessIdentityConfig",
                "cloudfront:GetDistribution",
                "cloudfront:GetDistributionConfig",
                "cloudfront:TagResource",
                "cloudfront:UntagResource",
                "cloudfront:UpdateCloudFrontOriginAccessIdentity",
                "cloudfront:UpdateDistribution",
                "cognito-identity:CreateIdentityPool",
                "cognito-identity:DeleteIdentityPool",
                "cognito-identity:DescribeIdentity",
                "cognito-identity:DescribeIdentityPool",
                "cognito-identity:SetIdentityPoolRoles",
                "cognito-identity:UpdateIdentityPool",
                "cognito-idp:CreateUserPool",
                "cognito-idp:CreateUserPoolClient",
                "cognito-idp:DeleteUserPool",
                "cognito-idp:DeleteUserPoolClient",
                "cognito-idp:DescribeUserPool",
                "cognito-idp:UpdateUserPool",
                "cognito-idp:UpdateUserPoolClient",
                "cognito-idp:CreateResourceServer",
                "cognito-idp:DeleteResourceServer",
                "cognito-idp:ListUserPoolClients",
                "dynamodb:CreateTable",
                "dynamodb:DeleteItem",
                "dynamodb:DeleteTable",
                "dynamodb:DescribeTable",
                "dynamodb:PutItem",
                "dynamodb:UpdateItem",
                "dynamodb:UpdateTable",
                "iam:CreateRole",
                "iam:DeleteRole",
                "iam:DeleteRolePolicy",
                "iam:GetRole",
                "iam:GetUser",
                "iam:PassRole",
                "iam:PutRolePolicy",
                "iam:UpdateRole",
                "lambda:AddPermission",
                "lambda:CreateFunction",
                "lambda:DeleteFunction",
                "lambda:GetFunction",
                "lambda:GetFunctionConfiguration",
                "lambda:InvokeAsync",
                "lambda:InvokeFunction",
                "lambda:RemovePermission",
                "lambda:TagResource",
                "lambda:UpdateFunctionCode",
                "lambda:UpdateFunctionConfiguration",
                "s3:*",
                "amplify:*"
            ],
            "Resource": "*"
        }
    ]
}
-
Give a name and a description to the policy and click Create policy at the bottom of the page.
-
Return the to Add User tab, click the reload button () to reload the list of policies, search for the policy you just created and select it. Click Next: Tags
-
Do not attach any tag, click Next: Preview
-
Review your choices and click Create user
-
Take note of the Access Key ID and the Secret access key . You will need these in the next section.
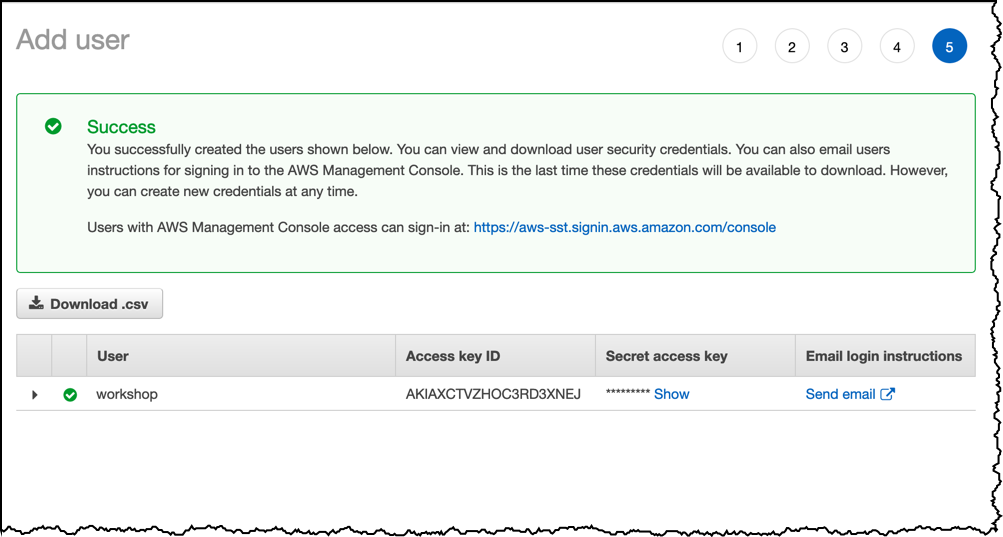 When the two keys are copied, click Close
This screen in the IAM console is the only place where you can access the secret access key. If you fail to take a note it at this stage, you will need to regenerate a new one later.
You now have an IAM user with the priviledges required by Amplify. In the remaining steps of this workshop, you will use this IAM user to programmatically access your AWS account from your laptop.
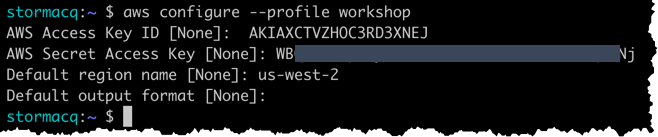
Configure the aws command line
Before using aws command line, you need to configure a default region and give the access key and secret key of the IAM user created in the previous step.
A best practice is to deploy your infrastructure close to your customers, let’s configure a default AWS Region for this workshop : Oregon (us-west-2) for North America or Frankfurt (eu-central-1) for Europe.
In the Terminal, type:
aws configure
(if the AWS CLI is already configured, you can create a new profile by typing aws configure --profile workshop )
-
At the AWS Access Key prompt, enter the IAM user access key
-
At the AWS Secret Access Key prompt, enter the IAM user secret access key
-
At the Default region name, enter the region close to your customers (in this workshop, we use us-west-2 for Northern America)
-
At the Default output format, keep the defaut None
In the Terminal, type:
aws configure
(if the AWS CLI is already configured, you can create a new profile by typing aws configure --profile workshop )
-
At the AWS Access Key prompt, enter the IAM user access key
-
At the AWS Secret Access Key prompt, enter the IAM user secret access key
-
At the Default region name, enter the region close to your customers (in this workshop, we use eu-central-1 for Europe)
-
At the Default output format, keep the defaut None
This should look like the below (actual values will vary):