Update application code
Now that the cloud-based backend is ready, let’s modify the application code to add an authentication screen. We’re going to make several changes in the application:
- add AWS Amplify dependencies to the project
- add the code to trigger the authentication UI and monitor the state of sessions
- add a Landing view to route users to the non-authenticated and authenticated views
The view navigation will look like this:

We choose to write all AWS specific code in the AppDelegate class, to avoid spreading dependencies all over the project. This is a design decision for this project, you may adopt other design for your projects. We use class extension mechanism to separate concerns (authentication, file access, API access) and make it possible to split concerns in multipe files. However, for this workshop, we kept all code in the AppDelegate.swift class for easy copy / paste.
Add authentication code
Let’s start to add a flag in the UserData class to keep track of authentication status. We add line height to the existing code. You can copy/paste the whole content to replace Landmarks/Models/UserData.swift :
// Landmarks/Models/UserData.swift
import Combine
import SwiftUI

final class UserData: ObservableObject {
    @Published var showFavoritesOnly = false
    @Published var landmarks = landmarkData
    @Published var isSignedIn : Bool = false
}
Add user authentication logic to Landmarks/AppDelegate.swift:
import SwiftUI
import ClientRuntime
import Amplify
import AWSCognitoAuthPlugin

class AppDelegate: NSObject, UIApplicationDelegate, ObservableObject {

    // https://stackoverflow.com/questions/66156857/swiftui-2-accessing-appdelegate
    static private(set) var instance: AppDelegate! = nil

    public let userData = UserData()

    func application(_ application: UIApplication, didFinishLaunchingWithOptions launchOptions: [UIApplication.LaunchOptionsKey: Any]?) -> Bool {

        AppDelegate.instance = self

        do {
            // reduce verbosity of AWS SDK
            SDKLoggingSystem.initialize(logLevel: .warning)
            //Amplify.Logging.logLevel = .info

            try Amplify.add(plugin: AWSCognitoAuthPlugin())

            try Amplify.configure()
            print("Amplify initialized")

            // asynchronously
            Task {

                // check if user is already signed in from a previous run
                let session = try await Amplify.Auth.fetchAuthSession()

                // and update the GUI accordingly
                await self.updateUI(forSignInStatus: session.isSignedIn)
            }

            // listen to auth events.
            // see https://github.com/aws-amplify/amplify-ios/blob/dev-preview/Amplify/Categories/Auth/Models/AuthEventName.swift
            let _  = Amplify.Hub.listen(to: .auth) { payload in
                switch payload.eventName {

                case HubPayload.EventName.Auth.signedIn:

                    Task {
                        print("==HUB== User signed In, update UI")
                        await self.updateUI(forSignInStatus: true)
                    }

                    // if you want to get user attributes
                    Task {
                        let authUserAttributes = try? await Amplify.Auth.fetchUserAttributes()
                        if let authUserAttributes {
                            print("User attribtues - \(authUserAttributes)")
                        } else {
                            print("Failed fetching user attributes failed")
                        }
                    }

                case HubPayload.EventName.Auth.signedOut:
                    Task {
                        print("==HUB== User signed Out, update UI")
                        await self.updateUI(forSignInStatus: false)
                    }

                case HubPayload.EventName.Auth.sessionExpired:
                    Task {
                        print("==HUB== Session expired, show sign in aui")
                        await self.updateUI(forSignInStatus: false)
                    }

                default:
                    //print("==HUB== \(payload)")
                    break
                }
            }

        } catch let error as AuthError {
            print("Authentication error : \(error)")
        } catch {
            print("Error when configuring Amplify \(error)")
        }
        return true
    }
}

// MARK: -- Authentication code
extension AppDelegate {

    // change our internal state, this triggers an UI update on the main thread
    @MainActor
    func updateUI(forSignInStatus : Bool) async {
        self.userData.isSignedIn = forSignInStatus
    }

    // signin with Cognito web user interface
    public func authenticateWithHostedUI() async throws {

        print("hostedUI()")

        // UIApplication.shared.windows.first is deprecated on iOS 15
        // solution from https://stackoverflow.com/questions/57134259/how-to-resolve-keywindow-was-deprecated-in-ios-13-0/57899013

        let w = UIApplication
            .shared
            .connectedScenes
            .compactMap { $0 as? UIWindowScene }
            .flatMap { $0.windows }
            .first { $0.isKeyWindow }

        let result = try await Amplify.Auth.signInWithWebUI(presentationAnchor: w!)
        if (result.isSignedIn) {
            print("Sign in succeeded")
        } else {
            print("Signin failed or required a next step")
        }
    }

    // signout globally
    public func signOut() async throws {

        // https://docs.amplify.aws/lib/auth/signOut/q/platform/ios
        let options = AuthSignOutRequest.Options(globalSignOut: true)
        let _ = await Amplify.Auth.signOut(options: options)
        print("Signed Out")
    }
}
What did we add ?
-
line 2-4 : we import Amplify libraries. ClientRuntime is part of the AWS SDK, it is just required to change the logging verbosity of the AWS SDK for Swift.
-
line 24-25 : we initialize Amplify
-
line 37-75 : we add an
Amplify.Hub.listen(to: .auth)switch statement to listen for changes in authentication status. That code callsself.updateUI()to update theisSignedInflag inside theuserDataobject. SwiftUI will automatically trigger a user interface refresh when the state of this object changes. You can learn more about SwiftUI binding in the SwiftUI documentation. -
line 95-116 : we add an
authenticateWithHostedUI()method to trigger the UI flow using Cognito’s hosted web user interface. -
line 119-125 : we add a
signOut()method to sign the user out.
Before proceeding to the next steps, build (⌘B) the project to ensure there is no compilation error.
Route authenticated and non-authenticated views
In this section, we’re going to add a new application entry point: the LandingView. This view will check if the user is authenticated and will display either the authentication view or the main application view.
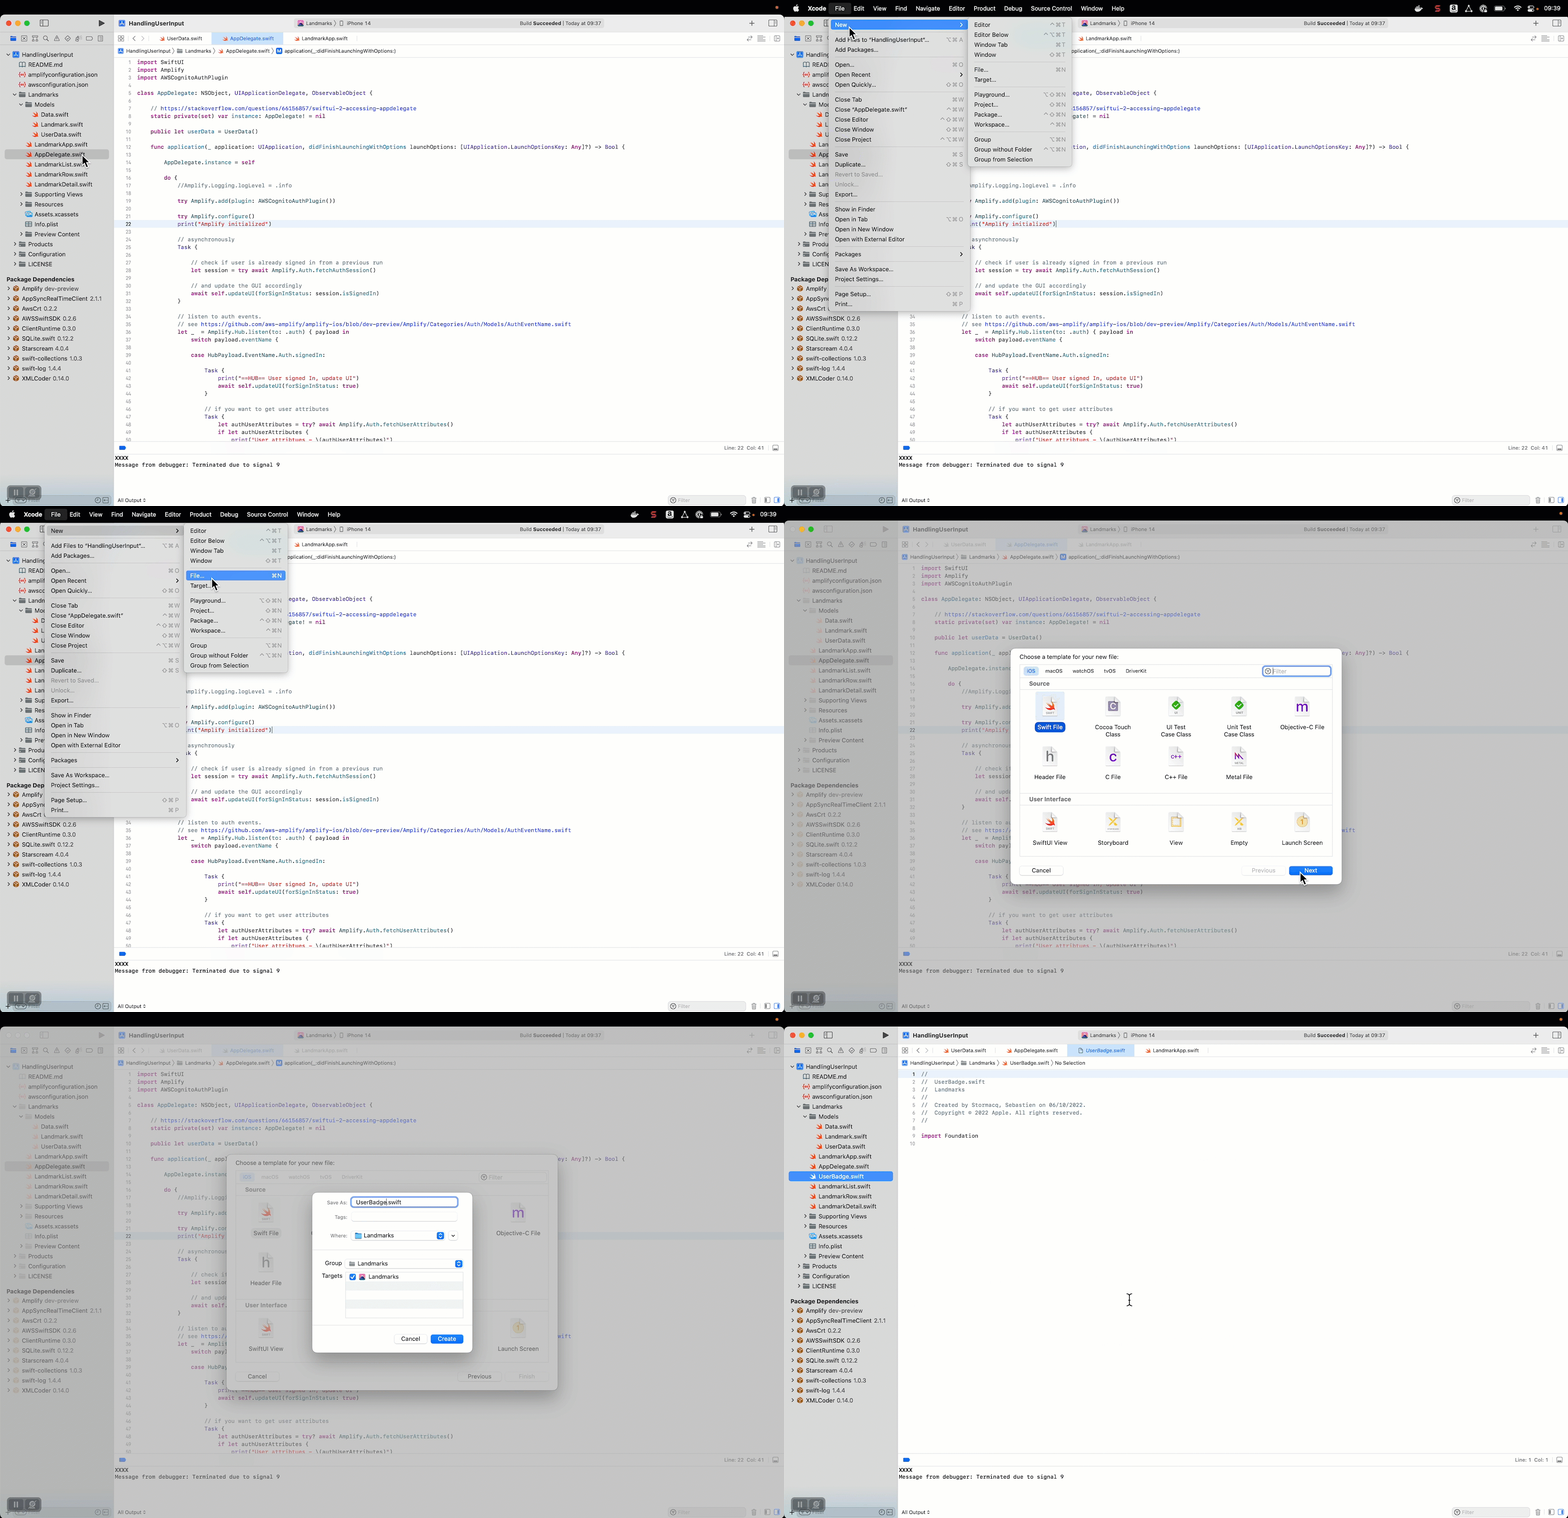
Let’s create two new Swift classes in $PROJECT_DIRECTORY/Landmarks (same directory as AppDelegate.swift or LandmarkList.swift)
- UserBadge.swift is the view to use when user is not authenticated
- LandingView.swift is the application entry point. It displays either
UserBadgeorLandmarkListbased on user’s authentication status.
To add a new Swift class to your project, use Xcode menu and click File, then New or press ⌘N and then enter the file name.

Repeat the operation twice, once for UserBadge.swift and once for LandingView.swift
UserBadge.swift
The user badge is a very simple graphical view representing a big login button.
//  UserBadge.swift
//  Landmarks

import SwiftUI

struct UserBadge: View {
    var body: some View {
        GeometryReader { geometry in
        ZStack {
            Circle().stroke(Color.blue, lineWidth: geometry.size.width/50.0)

            VStack {
                Circle()
                    .frame(width:geometry.size.width / 2.0, height:geometry.size.width / 2.0, alignment: .center)
                    .foregroundColor(.blue)
                    .offset(x:0, y:geometry.size.width/3.3)

                Circle()
                    .frame(width:geometry.size.width, height:geometry.size.width, alignment: .center)
                    .foregroundColor(.blue)
                    .offset(x:0, y:geometry.size.width/3.0)


            }
        }
        .clipShape(Circle())
        .shadow(radius: geometry.size.width/30.0)
        }
    }
}

struct UserBadge_Previews: PreviewProvider {
    static var previews: some View {
        UserBadge()
    }
}
LandingView.swift
This LandingView selects the view to present based on authentication status. When user is not authenticated, it shows the UserBadge. Clicking on the UserBadge triggers the authenticateWithHostedUI() method. When user is authenticated, it passes the user object to LandmarkList.
Pay attention to the @ObservedObject annotation. This tells SwiftUI to invalidate and redraw the View when the state of the object changes. When user signs in or signs out, LandingView will automatically adjust and render the UserBadge or the LandmarkList view.
//
//  LandingView.swift
//  Landmarks

// Landmarks/LandingView.swift

import SwiftUI

struct LandingView: View {
    @ObservedObject public var user : UserData
    @EnvironmentObject private var appDelegate: AppDelegate

    var body: some View {

        return VStack {
            // .wrappedValue is used to extract the Bool from Binding<Bool> type
            if (!$user.isSignedIn.wrappedValue) {
                Button(action: {

                    Task {
                        try await appDelegate.authenticateWithHostedUI()
                    }
                }) {
                        UserBadge().scaleEffect(0.5)
                    }
            } else {
                LandmarkList().environmentObject(user)
            }
        }
    }
}

struct LandingView_Previews: PreviewProvider {
    static var previews: some View {
        let userDataSignedIn = UserData()
        userDataSignedIn.isSignedIn = true
        let userDataSignedOff = UserData()
        userDataSignedOff.isSignedIn = false
        return Group {
            LandingView(user: userDataSignedOff)
            LandingView(user: userDataSignedIn)
        }
    }
}
Update LandmarkApp.swift
Finally, we update LandmarkApp.swift to launch our new LandingView instead of launching LandmarkList when the application starts. Highlighted lines show the update. You can copy/paste the whole content to replace Landmarks/LandmarkApp.swift :
//
//  LandmarkApp.swift
//  Landmarks

import SwiftUI

@main
struct LandmarkApp: App {

    @UIApplicationDelegateAdaptor(AppDelegate.self) var appDelegate

    var body: some Scene {
        WindowGroup {
            LandingView(user: appDelegate.userData)
        }
    }
}
Add a signout button
To make our tests easier and to allow users to signout and invalidate their session, let’s add a signout button on the top of the LandmarkList view. Highlighted lines show the update. You can copy/paste the whole content to replace Landmarks/LandmarkList.swift.
/*
 See LICENSE folder for this sample’s licensing information.

 Abstract:
 A view showing a list of landmarks.
 */

import SwiftUI

struct SignOutButton : View {
    @EnvironmentObject private var appDelegate: AppDelegate

    var body: some View {
        NavigationLink(destination: LandingView(user: appDelegate.userData)) {
            Button(action: {
                Task {
                    try await appDelegate.signOut()
                }
            }) {
                Text("Sign Out")
            }
        }
    }
}

struct LandmarkList: View {
    @EnvironmentObject private var userData: UserData

    var body: some View {
        NavigationView {
            List {
                Toggle(isOn: $userData.showFavoritesOnly) {
                    Text("Show Favorites Only")
                }

                ForEach(userData.landmarks) { landmark in
                    if !self.userData.showFavoritesOnly || landmark.isFavorite {
                        NavigationLink(
                            destination: LandmarkDetail(landmark: landmark)
                                .environmentObject(self.userData)
                        ) {
                            LandmarkRow(landmark: landmark)
                        }
                    }
                }
            }
            .navigationBarTitle(Text("Landmarks"))
            .navigationBarItems(trailing: SignOutButton())
        }
    }
}

struct LandmarksList_Previews: PreviewProvider {
    static var previews: some View {
        ForEach(["iPhone 13", "iPhone 14"], id: \.self) { deviceName in
            LandmarkList()
                .previewDevice(PreviewDevice(rawValue: deviceName))
                .previewDisplayName(deviceName)
        }
        .environmentObject(UserData())
    }
}
What we did just change ?
-
we created a
SignOutButtonstruct that has a reference toAppDelegateand callssignOut()when pressed. The button is just a text with a navigation link pointing toLandingView -
we added that button as trailing item in the navigation bar.
Configure URI for redirection after authentication
Uppon sucessful authentication, the Cognito server redirects to the URI we provided when we configured Amplify authentication in step 3.1. We used the landmarks:// URI. We need to tell iOS to launch our app when a request is made for this URI.
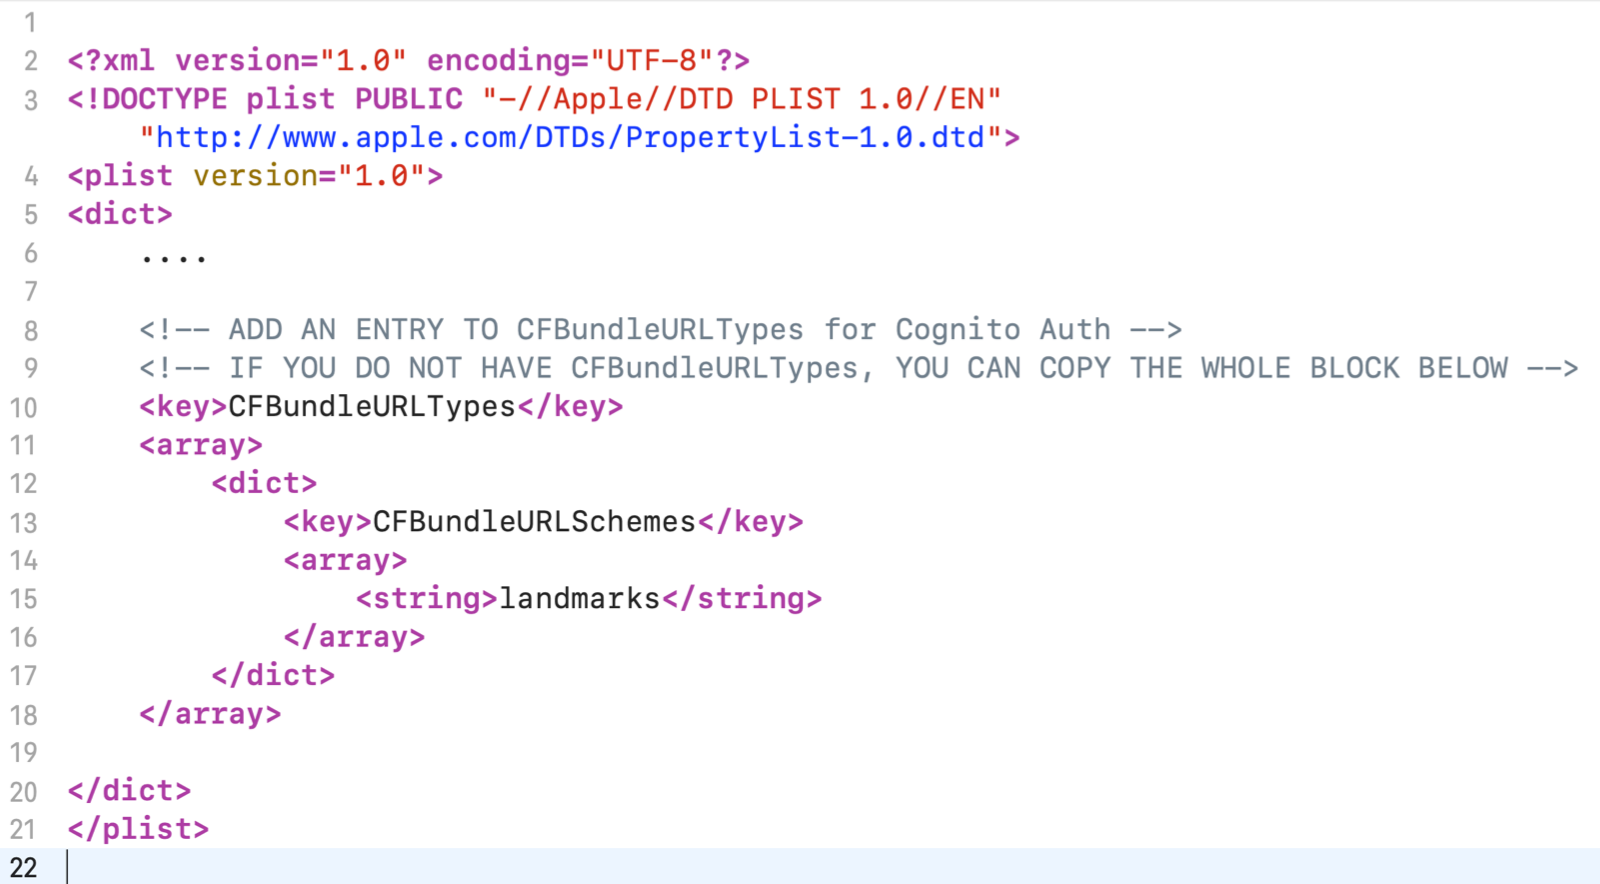
To do this, we add landmarks:// to the app’s URL schemes:
-
In Xcode, right-click Info.plist and then choose Open As > Source Code.
-
Add the following entry (lines 6-16) in URL scheme:
     <!-- YOUR OTHER PLIST ENTRIES HERE -->

     <!-- ADD AN ENTRY TO CFBundleURLTypes for Cognito Auth -->
     <!-- IF YOU DO NOT HAVE CFBundleURLTypes, YOU CAN COPY THE WHOLE BLOCK BELOW -->
     <key>CFBundleURLTypes</key>
     <array>
         <dict>
             <key>CFBundleURLSchemes</key>
             <array>
                 <string>landmarks</string>
             </array>
         </dict>
     </array>
The complete file structure should look like this (redacted for brevity).

Before proceeding to the next steps, build (⌘B) the project to ensure there is no compilation error.