Add cloud storage
Now that we have the user authentication and API in place, let’s tackle the storage of the image. The current version of the application is loading the landmark’s images from a local bundle. The images are located in Landmarks/Resources folder and Data.swift has the logic to load the images. The class ImageStore reads the local bundle and maintain an in-memory cache to avoid reading the same image from the bundle over and over again.
In addition to providing Authentication and API management, Amplify also offers a storage service for applications. The Storage service is backed by Amazon S3 and a set of client classes to easily download and upload files from your applications.
We’re going to follow a similar pattern as in the two previous sections:
- we will first use Amplify command line to provision backend resources
- then we will modify the application code to leverage the storage service.
Add a storage backend
Just like we added the authentication and API, we use the amplify command line to provision the backend storage service.
In a Terminal, type:
cd $PROJECT_DIRECTORY
amplify add storage
-
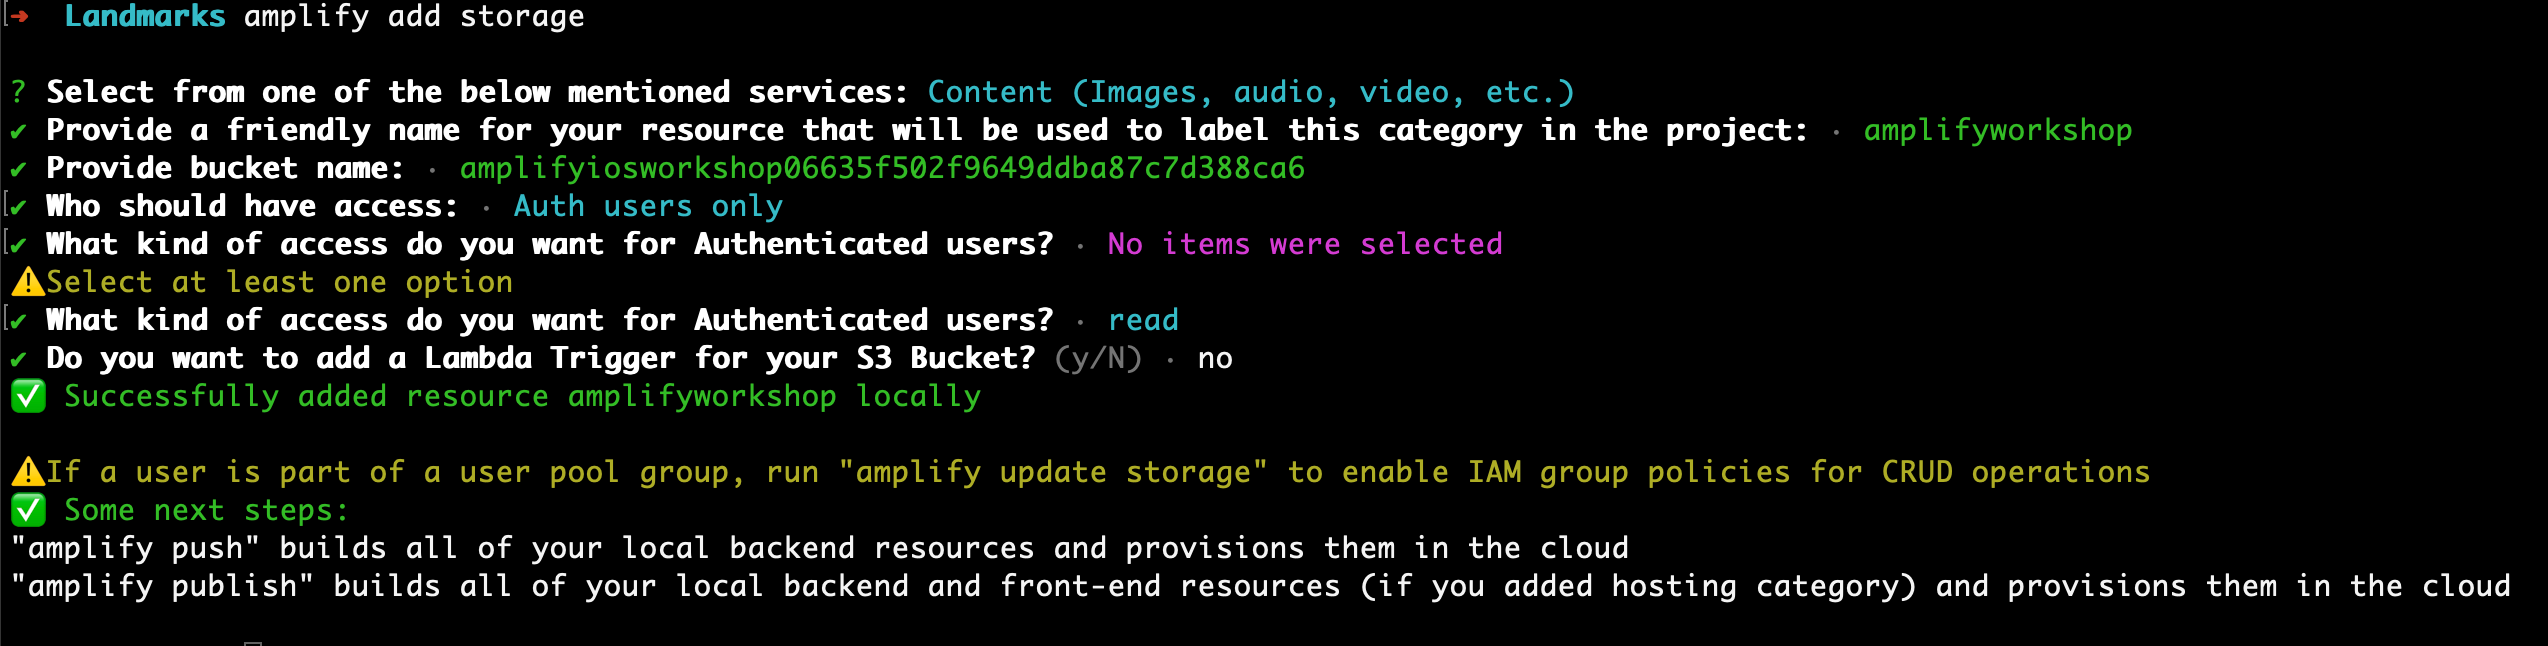
Please select from one of the below mentioned services. Accept the default Content (Images, audio, video, etc.) and press enter.
-
Please provide a friendly name for your resource that will be used to label this category in the project. Enter a name such as amplifyiosworkshop and press enter.
-
Please provide bucket name. Accept the default amplifyiosworkshopxxxxx and press enter. As Amazon S3 bucket must be globally unique, the xxxx part is randomly generated to avoid a name conflict with another bucket from another AWS customer.
-
Who should have access:. Accept the default Auth users only and press enter.
-
What kind of access do you want for Authenticated users? Use the arrow key to select read, press space and press enter.
-
Do you want to add a Lambda Trigger for your S3 Bucket? Accept the default (No) and press enter.
amplify creates the required resources to depoy your storage service in the cloud.
Create the storage backend in the cloud
In a Terminal, assuming you are still in your project directory, type:
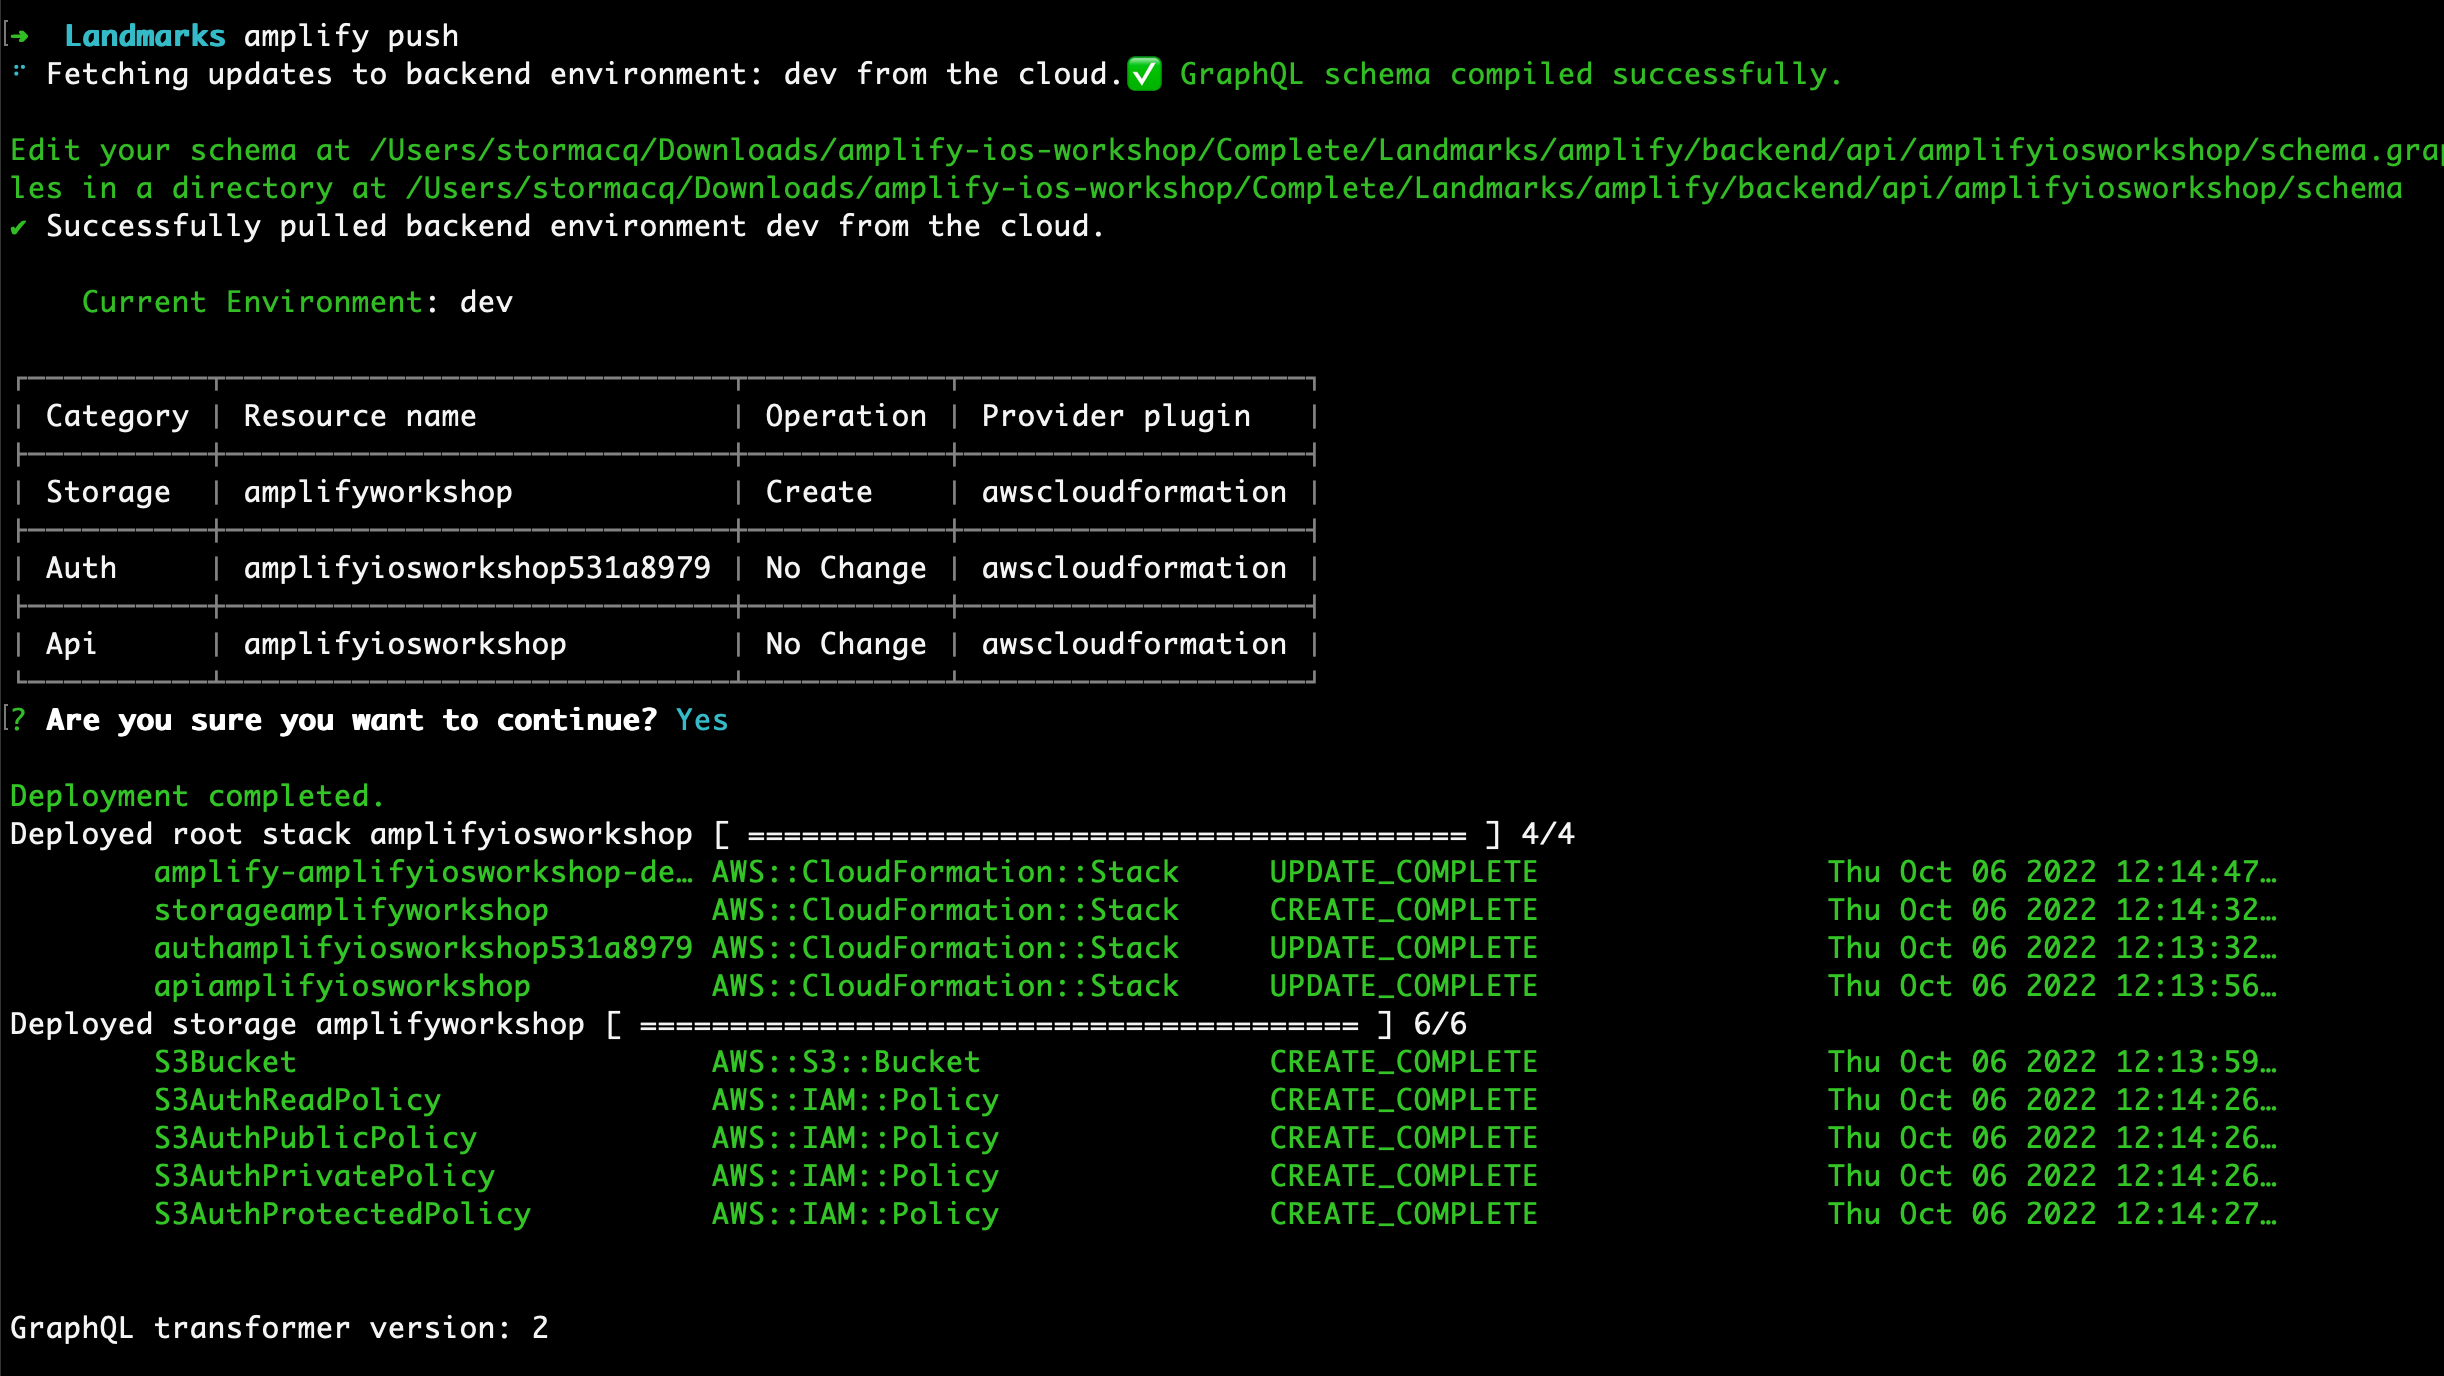
amplify push
- Are you sure you want to continue? Review the table and verify the Storage service is being Created. Accept the default (Yes) and press enter.
Amplify creates the backend infrastructure : an Amazon S3 bucket. After a while, the command should return with no error.
Upload images to Amazon S3
The sample application we started from uses local iamges (Landmarks/Resources/…jpg). We provide a script to upload the images to the cloud storage we just created.
In a Terminal, type:
cd $PROJECT_DIRECTORY
../../scripts/init_s3.sh
The script should output the following:
Uploading project images to your S3 bucket : amplifyiosworkshop06635f502f9649ddba87c7d388ca674008-dev/public
upload: Landmarks/Resources/landmarkData.json to s3://amplifyiosworkshop06635f502f9649ddba87c7d388ca674008-dev/public/landmarkData.json
upload: Landmarks/Resources/chincoteague.jpg to s3://amplifyiosworkshop06635f502f9649ddba87c7d388ca674008-dev/public/chincoteague.jpg
upload: Landmarks/Resources/chilkoottrail.jpg to s3://amplifyiosworkshop06635f502f9649ddba87c7d388ca674008-dev/public/chilkoottrail.jpg
upload: Landmarks/Resources/stmarylake.jpg to s3://amplifyiosworkshop06635f502f9649ddba87c7d388ca674008-dev/public/stmarylake.jpg
upload: Landmarks/Resources/rainbowlake.jpg to s3://amplifyiosworkshop06635f502f9649ddba87c7d388ca674008-dev/public/rainbowlake.jpg
upload: Landmarks/Resources/lakemcdonald.jpg to s3://amplifyiosworkshop06635f502f9649ddba87c7d388ca674008-dev/public/lakemcdonald.jpg
upload: Landmarks/Resources/silversalmoncreek.jpg to s3://amplifyiosworkshop06635f502f9649ddba87c7d388ca674008-dev/public/silversalmoncreek.jpg
upload: Landmarks/Resources/charleyrivers.jpg to s3://amplifyiosworkshop06635f502f9649ddba87c7d388ca674008-dev/public/charleyrivers.jpg
upload: Landmarks/Resources/umbagog.jpg to s3://amplifyiosworkshop06635f502f9649ddba87c7d388ca674008-dev/public/umbagog.jpg
upload: Landmarks/Resources/twinlake.jpg to s3://amplifyiosworkshop06635f502f9649ddba87c7d388ca674008-dev/public/twinlake.jpg
upload: Landmarks/Resources/hiddenlake.jpg to s3://amplifyiosworkshop06635f502f9649ddba87c7d388ca674008-dev/public/hiddenlake.jpg
upload: Landmarks/Resources/icybay.jpg to s3://amplifyiosworkshop06635f502f9649ddba87c7d388ca674008-dev/public/icybay.jpg
upload: Landmarks/Resources/turtlerock.jpg to s3://amplifyiosworkshop06635f502f9649ddba87c7d388ca674008-dev/public/turtlerock.jpg
Now that the storage is in place and the images are in the cloud, let’s modify the application to load the images from Amazon S3 instead of from the local bundle.
Anatomy of the import script (optional)
The init_s3.sh script is much shorter than the previous one we used to initialise the database. The script uses the aws command line tool to synchronize the local resources directory with the Amazon S3 bucket.
#
# The code below is an extract from the script 'init_s3.sh'
# Check the full script in $PROJECT_DIRECTORY/../../../
#

CODE_DIR=...
IMAGE_BUCKET=...

aws s3 sync $CODE_DIR/Landmarks/Resources/ s3://$IMAGE_BUCKET/public
Note that the public prefix does not mean anybody can access the images. It means any authenticated user can read and write the images. Amplify Storage service supports two other storage classes : protected/{user_identity_id}/ for files readable by all authenticated users but writable only by the owner, and private/{user_identity_id}/ for files only accessible by their owner.